Jupydoc: Generate documents with Python code
2020-11-17 11:41
Toby Burnett <tburnett@uw.edu>
University of Washington
This is a comprehensive manual for the Jupydoc document-creation system, which both describes and tests all its features.
1. Introduction
What it is not
Jupydoc, despite the name, does not explicitly depend on Jupyterlab. It is not a nice way to turn detailed notebooks into documents: If you want that, see this system.
What is it, and how does it work?
Jupydoc is not centered on a jupyterlab notebook. It is designed to make it easy to develop a document with a noteboook, but the medium is a Python class, not a notebook. Since it is based on code, to the extent that details of the document depend on execution of the code, the document may represent the code development itself.
So while it is designed to be used to develop documents based on code in a JupyterLab environment, It does not actually require that, but does depend on the IPython and nbconvert components.
Some points to illustrate the design and operation are:
Code and markdown cells in a Jupyterlab notebook
The origin of this package was rooted in a desire to be able to combine the nice formatting capability of markdown cells, with the output from the computation in a code cell. By default, any matplotlib figures created in its computation will automatically appear below the cell. This behavior, it turns out, can be controlled by code executed in the cell. The key here is that code can create markdown text, which will be interpreted just as the text in a markdown cell. This includes LaTex. The markdown so created is nicely rendered in the notebook. This is accomplishted by IPython. So a notebook is not actually required, seenbconvertbelow.Python inspection
The inspection capability gives access to two important elements of a function:- docstring— a text string immediately following the function declaration.
- symbol table—in python terms, a "dict" with variable names as keys, and where each value is a reference to the object represented by the name
Python string format method
Since python 2.6, text strings have had a "format" method, which interprets occurrences of "{...}", replacing what it finds between the curly brackets with its evaluation as an expression. (With python 3, this is built into special format strings.)nbconvert
This separate package supports creation of an HTML document from notebook-formatted data, specifically interpreting Jupyterlab's version of markdown. It is necessary to produce an (almost) identical-looking document to what is rendered in the notebook.
What is it good for?
A document like this
This document is itself a demonstration, testing all the features it describes! It was generated using member functions of the classjupydoc.Document, which inherits fromjupydoc.Publisher. Each such function represents a section of the document. The code that produced this document is in fact testing and describing the code that produces it.Simple Jupyterlab-based analyses
Rather than spreading output among several cells, this encourages making a coherent description, including plots, formulae, tables, etc. in the area below a single cell.Personal notebook
Rather than cutting and pasting single plots to a personal notebook, this allows the clipping to include many details, with LaTex formulas perhaps. Since it is easy to produce web pages at the same time, they could function as a notebook.Presentations and analysis documents
Sharing one's analysis results with others is a small step from the personal notebook. The days of needing PowerPoint to make presentations seem to be over, so the document can be the presentation medium.Publication?
Well, I'd not go that far, but the evolution to such should be easy, especially if relevant LaTex formulae, plots with captions and relevant description have already been done.
2. Basic framework
The simplest use case was mentioned above: Annotating plots from an analysis. It can be implemented as this, which can be used to test the options in the next section.
Example
The following shows a Jupyter cell execution:

Requirements
This shows the basic requirements for a function with this capability:
- Is a member of a class inheriting from
jupydoc.Publisher - Has a docstring, comment text which will be interpreted as Jupyter-style markdown, and which may contain variable names in curly-brackets,
- Has executable code, presumably creating variables, the values of which will shown in the output.
- Last line of the code is
self.publishme().
Unlike a formatted string, entries in curly brackets cannot be executed; they are names of variables accessible to the code.
Output
The above generates a display in the notebook. Note that the `docpath='.' specifies that output should go into the current folder, where the notebook is. To write it to a web doc as well, add the line
doc.save()which will result in something like
saved to "/home/burnett/work/notebooks/Basic"The document was written into a "saved to" folder, as a file index.html and also folders figures or images
if needed. The name of that folder, in this case Basic, is by default constructed by appending the class name to the
the Python module name, itself related to the file name by
replacing dots with slashes and adding a ".py". In this case there was no module.
In summary, the structure looks like this:
    docpath ("/home/burnett/work/notebooks")
      | docname ("Basic")
         | index.html
         | figures
            | fig01.png
            | ...
         | images
            | ...
The folder pointed by docpath could contain other documents, a feature used in the multiple-document section of this
description.
3. Variable Formatting
The list of possible variable names comes from three sources, each one updating the previous set.
- Built-in. A class variable
predefined. This is set to the useful values discussed here, but of course the user may update or replace it. - The local variables available to the code in the function, locally defined or defined
in the argument list, especially "self". (So predefined variables are also
self.predefined.var) - Variables defined in the call to
publishme, collected with Python's**kwargsmechanism. These may override any of the previous.
This section examines formating options for such variables in curly brackets.
3.1 Scalars
A scalar variable, say from an expression in the codeq=1/3, can be interpreted in the docstring with "q={q:.3f}", resulting in
q=0.333.
3.2 Python lists and dicts
These basic Python data structures are represented using the "pretty printer"pprint
For example a list generate by n = list(range(1,11)) appears thus:
[1, 2, 3, 4, 5, 6, 7, 8, 9, 10]
.And a dict generated by d = dict((i,2**i) for i in n) is this:
{1: 2, 2: 4, 3: 8, 4: 16, 5: 32, 6: 64, 7: 128, 8: 256, 9: 512, 10: 1024}
3.3 LaTex
Jupyter-style markdown can contain LaTex expressions. For the following, unlike the simple "$E=mc^2$"
→ $E=mc^2$ , it is necessary that the docstring be preceded by an "r". So,
\begin{align*}
\sin^2\theta + \cos^2\theta =1
\end{align*}
Results in:
\begin{align*}
\sin^2\theta + \cos^2\theta =1
\end{align*}
Evaluation of variables can occur within the expression as well.
3.4 Images
Images may be inserted into the docucument, as follows: Using the jupydoc function image, set a variable with a call `self.image(filename)':launch_image = self.image( 'images/fermi-launch.jpg',
caption='launch of Fermi on a Delta II on June 11, 2008", width=300)referred to in this text as "{launch_image}", will produce this:

This uses the HTML5 figure tag,
which manages a caption. One can also set the width or height,
see the discussion on the
HTML img tag.
The full path for the name if not absolute, is relative to the source file.
Unless the image is already in the subfolder images as is the case here, it will be copied there, with an appended fig_xx.
An option is to specify an image_folder in the class constructor, for example
self.image_folder = '$HOME/images'3.5 Figures
This feature requires thatmatplotlib has been installed.
Any number of Matplotlib Figure objects can be included.
An entry "{fig1}", along with code that defines fig1 like this:
x = np.linspace(0,10)
fig1,ax=plt.subplots(num=self.newfignum(), figsize=(4,3))
ax.plot(x, x**2)
ax.set(xlabel='$x$', ylabel='$x^2$', title=f'figure {fig1.number}')
fig1.caption='''Caption for Fig. {fig1.number}, which
shows $x^2$ vs. $x$.'''produces:
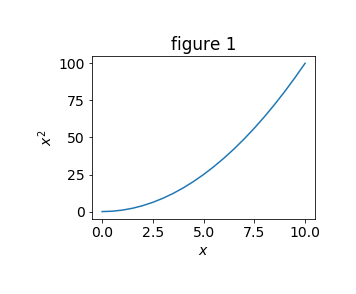
Note the convenience of defining a caption by adding the text as an attribute of
the Figure object.
The self.newfignum() returns a new figure number. It is necessary to for all
the figures in a section to be unique. But the actual number is set to be sequential for
the whole document.
Then number can be referred to in the text as {fig1.number}.
3.6 DataFrames
(This feature is only available if pandas is installed)The code, from this tutorial:
# intialise data of lists.
data = {'Name':['Tom', 'nick', 'krish', 'jack'],
'Age':[20, 21, 19, 18]}
# Create DataFrame
df = pd.DataFrame(data)
Results in "{df}" appearing as
| Name | Age |
|---|---|
| Tom | 20 |
| nick | 21 |
| krish | 19 |
| jack | 18 |
3.7 Other Formatting options
Markdown text is designed to be readable and easy to compose, a huge difference from the formal HTML, to which it is translated. One can of course insert HTML directly into the text, of course compromising the readability, and requiring HTML knowledge. Jupydoc processing allows inserting predefined strings when processing the docstring text, which represents a compromise.Indenting
Indenting a paragraph is not directly possible with markdown. But we can easily insert the appropriate HTML
- {indent}:
<p style="margin-left: 5%">—the margin is predefined, easily changed by the user - {endp}:
</p>— Since it represents the end of a paragraph.
Demonstration:
This paragraph is indented 5%. It was preceded by {indent} and followed by {endl}.
To start a new line in this, or any other paragraph, insert "<br>".
Preformatted text from other sources
There are several ways to introduce text from other sources, all of which use the monospace font
monospace
The function monospace(*text*) is provided to achieve insertion of
"preformatted" text with a monospace font.
It can be invoked with a text string, or any object which returns a description of itself via its class __str__
function.
It has options summary and open to allow collapsible output. These use the
HTML5 <details> tag. Specifically, if summary is set to a string,
that will be displayed with a clickable diamond. The output will be hidden unless there is also a open=True.
For example
test_string = '\n'.join([f'This is line {i}' for i in range(10)])
mono_string = self.monospace(test_string, summary='monospace demo')Produces this:
monospace demo
This is line 0
This is line 1
This is line 2
This is line 3
This is line 4
This is line 5
This is line 6
This is line 7
This is line 8
This is line 9
The following all invoke monospace, allowing also summary and open args.
shell: capture output from a shell command
The function shell will execute one or more shell commands, return the preformatted text.
So, this code line,
shell_test = self.shell('env | grep PYTHON')
produces this:
CONDA_PYTHON_EXE=/home/burnett/miniconda3/bin/python
PYTHONPATH=/mnt/c/users/thbur/OneDrive/work/jupydoc:/mnt/c/users/thbur/OneDrive/work/lat/
capture_print: capture printout
To execute code containg uses of the print function, that is, writing to sys.stdout,
the function capture_print is provided. As an example
with self.capture_print(summary='captured printout') as captured_text:
print(test_string)Then {captured_text} will be rendered as:
captured printout
This is line 0
This is line 1
This is line 2
This is line 3
This is line 4
This is line 5
This is line 6
This is line 7
This is line 8
This is line 9
4. Making a document
This section introduces an enhancement to the basic framework to create a structured document, with a title page, sections, and subsections. To accomplish this there are two basic requirement:
- the class needs to inherit from
DocPublisher, - the layout of the document must be defined in the class docstring.
4.1 Class Docstring
The docstring is inyaml, a human-readable data-serialization language
often used for configuration files. The following items, all optional, are used to define the document:
- title If more than one line, the second is a subtitle. Note that this entry may contain curly-bracket fields with class variable names. One example is "{version}".
- author Will be centered.
- sections A single string with names of functions corresponding to sections and possible subsections that will be parsed
- abstract Can be any length.
About the sections specification, this is the specification for the present document:
sections: introduction
basic
variable_formatting [scalars list_and_dict latex images
figures dataframes other_formatting_options]
making_a_document [ class_docstring document_generation output_specification]
multiple_documents [docman_setup docman_usage docman_web index_document]
workflowCommas and line breaks are ignored, with subsection names enclosed in square brakets following the section name.
Any unrecognized fields are added to attributes of the class, available for
user configuration perhaps. For this, it is
user_info: "This is available to user."
4.2 Document Generation
Creation of the document is performed by invoking the instantiated call.DocPublisher itself allows for a demonstration:
from jupydoc import DocPublisher
doc = DocPublisher()
docThe last line provides a table of contents useful for selecting a section of subsection to display online. Actual production of the document is accomplished by invoking it as a function, e.g.,
doc('all')The "job" of the class is to produce the document that it is designed to do, which is performed by invoking it as a function. The interactive display is intended to select a single section, or subsection to examine while developing the code. If an output has been set, it will always generate the full HTML version. The argument possibilites are: 'all' as above, the name of the function whose output to examine, or the section or subsection number. In that case, a number that is beyond the range of sections or subsections will select the last on for display. For example, if section 4 has 5 subsections, "4.9" will select 4.5 for display. "4.0" displays section 4 and all its subsections.
4.3 Output Specification
The call described here runs thesave() function described in the Basic Framework section
The HTML document is a folder, containing the the document in a file index.html and folders figures or images
if needed. The name of that folder, called docname is by default constructed by appending the class name to the
the Python module name, itself related to the file name by
replacing dots with slashes and adding a ".py". The folder that it goes into is set by "docpath".
5.1 Setup
Here is a Jupyter notebook cell:from jupydoc import DocMan
dm = DocMan('jupydoc')
dmThe first line imports the Jupydoc document manager DocMan. The second instantiates it with the name of the package, or folder containing source documents. It must be in the Python path, or have been already loaded. The final line generates a summary of the file structure and available document classes:
Modules Classes
jupydoc.
documents ['Manual', 'Technicals']
docspath: /home/burnett/work/tburnett.github.ioThe first column, under "Modules", shows the file structure. Names ending with a period are packages, that is,
folders containing an __init__.py file, otherwise python files, or modules. The second column has the document
classes declared in the module.
In this case the package is jupydoc itself. Only one of its modules, the present one, the file, documents.py declared document classes.
Each source file defining a module needs to declare class(es) that it contains. This one has the lines:
from jupydoc import DocPublisher
__docs__ = ['Manual', 'Technicals']DocMan does a recursive search for all modules contained within the parent package.
Note that instead of "dm" on the last line, that "dm?" produces that, but also the signature had help for the function.
docspath
The parameter docspath is indentical to the docpath discussed above . The "s" is to
convey the multiple document orientation. It can be defined in the by a docspath= in the top-level package's __init__.py, which would
be overridden with an argument to the DocMan instantiation.
If the declaration is relative, it will be with respect to the top-level package.
5.2 Usage
With the DocMan instance generated in the setup phase, the following instantiates a document instance "JupyDoc", as described in the "Making a Document" section.doc = dm('Manual')One useful feature of instantiating the document via DocMan is that the module
containing the class is reloaded first, relieving the need to separately manage that
in the notebook. So changes to source are immediately made, and compilation errors
reported.
5.3 Web site
AfterDocMan instantiates a document class, before returning it to the user,
it adds an indexer attribute, a DocIndex instance. Then, before the document
saves itself, it invokes the indexer.
The indexer manages the folder docspath, containg the document as website.
This involves two files:
index.html, which defines content for the website, specifically a table of the documents that it containsindex.yamlAn editable index with information for each document, at least the date and title.
When the indexer is invoked, it updates both files.
Here is what the index looks like:

It is described in the next subsection.
Linked documents—client-mode
One can insert links to other documents saved by DocMan. This is especially useful in an
analysis mode where the linked document was generated in conjunction with a previous
analysis stage, perhaps preparing a dataset, available as attributes of the object.
To implement this, DocMan adds a callback to itself, 'docman`, to the object before calling it. Then the document can invoke the other document like this:
otherdoc, link = self.docman.client('Technicals')and then use the link: {link}, which evaluates to "../Technicals/index.html", can be used like this:
<a href={link}>some technical details</a>generates a link to some technical details, as well as the other document object itself.
The other document can detect that it was invoked in this way with an attribute
client_mode, and not regenerate the document if it exists.
5.4 Index Document
The folder containing the documents is indexed by a file index.html containing a table of links to the documents. It is actually a document itself, created by a class called "Index". There are two ways for the user to adjust its appearance:- The presence of an "Index" declaration in the
__init__.pyfile. It should be a yaml text string which declares "title" and "abastract", and optionally "author".
Index=\
'''
title: A collection of documents
abstract: |
These are the documents relevant to an important study.
'''- The presence of an "Index" document class.
It one of the documents is named "Index", and "Index" is not an attribute of __init__.py, then that document will be used to
create the index.html file.
6. Workflow
This started as a little project to allow me to better organize my research, incorporating generating research notebook (not JupyterLab) entries and facilitating generation of presentations. Some of the motivations were hinted at in the introduction.
It soon became apparent that this could be similarly useful to others, which generated a substantial effort to turn it into a clean package that would be iniviting not only to use, but to make improvements to.
It represents for me, a dramatic workflow paradigm change, implying revisions to present code, with a different file structure.
I have yet to spend much time on that, and plan to record conclusions here as I update this file.
Log of updates, observations
06/18/2020
Release "beta" version
06/22/2020
- Add
self.shell. - Adjust generation loop to avoid output to the document if any section fails, and optionally terminate. This is part of a realization that my early focus on this as a document-creation project needs to account for the more research-oriented analysis, where sections represent stages—so a failure of any stage should interrupt the process.
06/24/2020
Start on the idea of making a doc class a client: quietly perform some task with link to as associated document. Also allow a version of a document, with a compound name, classname.version
07/04/2020
Implement <detais>' formonospaceoutput, including the functionsshellandcapture_print`.
07/15/2020
Realize that I want it to be easy for a document to be a simple note, appropriate for a sidebar. To do this, I define a "title_page" function, with no sections. Maybe a separate class Memo?
11/17/2020
Implement the "Index" capability using a document called Index.
Document Manual, From module jupydoc.documents.py, created using jupydoc on 2020-11-17 11:41
Saved to /mnt/c/Users/thbur/OneDrive/work/tburnett.github.io/Manual
Python source code
class Manual(DocPublisher):
"""
title: |
Jupydoc: Generate documents with Python code
author: |
Toby Burnett
University of Washington
abstract: |
This is a comprehensive manual for the Jupydoc document-creation system,
which both describes and tests all its features.
sections: introduction
basic
variable_formatting [scalars list_and_dict latex images
figures dataframes other_formatting_options]
making_a_document [ class_docstring document_generation output_specification]
multiple_documents [docman_setup docman_usage docman_web index_document]
workflow
user_info: This is available to user.
"""
def __init__(self, **kwargs):
super().__init__(**kwargs)
# self.image_folder = '$HOME/images'
def introduction(self):
"""Introduction
### What it is **not**
Jupydoc, despite the name, does not explicitly depend on Jupyterlab.
It is not a nice way to turn
detailed notebooks into documents: If you want that, see this
[system](http://blog.juliusschulz.de/blog/ultimate-ipython-notebook).
### What is it, and how does it work?
Jupydoc is not centered on a jupyterlab notebook. It is designed to make it easy to *develop* a
document with a noteboook, but the *medium* is a Python class, not a notebook. Since it is
based on code, to the extent that details of the document depend on execution of the code,
the document may represent the code development itself.
So while it is designed to be used to develop documents based on code in a JupyterLab environment,
It does not actually require that, but does depend on the IPython and nbconvert components.
Some points to illustrate the design and operation are:
* **Code and markdown cells in a Jupyterlab notebook**
The origin of this package was rooted in a desire to be able to combine
the nice formatting capability of markdown cells, with the output from
the computation in a code cell. By default, any matplotlib
figures created in its computation will automatically appear below the cell.
This behavior, it turns out, can be controlled by code executed in the cell.
The key here is that code can create markdown text,
which will be interpreted just as the text in a markdown cell.
This includes LaTex. The markdown so created
is nicely rendered in the notebook.
This is accomplishted by IPython. So a notebook is not actually required,
see `nbconvert` below.
* **Python [inspection](https://docs.python.org/3/library/inspect.html)**
The inspection capability gives access to two important elements of a function:
* docstring— a text string immediately following the function declaration.
* symbol table—in python terms, a "dict" with variable names as keys,
and where each value is a reference to the object represented by the name
* **Python string format method**
Since python 2.6, text strings have had a "format" method, which interprets
occurrences of "{{...}}", replacing what it finds between the
curly brackets with its evaluation as an expression.
(With python 3, this is built into special format strings.)
* **[nbconvert](https://nbconvert.readthedocs.io/en/latest/)**
This separate package supports creation of an HTML document from notebook-formatted data, specifically
interpreting Jupyterlab's version of markdown.
It is necessary to produce an (almost) identical-looking document to what is rendered in the notebook.
### What is it good for?
* **A document like this**
This document is itself a demonstration, testing all the features it describes!
It was generated using member functions of the class `jupydoc.Document`,
which inherits from `jupydoc.Publisher`.
Each such function represents a section of the document.
The code that produced this document is in fact testing and
describing the code that produces it.
* **Simple Jupyterlab-based analyses**
Rather than spreading output among several cells, this encourages
making a coherent description, including plots, formulae, tables, etc.
in the area below a single cell.
* **Personal notebook**
Rather than cutting and pasting single plots to a personal notebook, this allows the clipping
to include many details, with LaTex formulas perhaps. Since it is easy to produce web pages at the
same time, they could function as a notebook.
* **Presentations and analysis documents**
Sharing one's analysis results with others is a small step from the personal notebook. The days of
needing PowerPoint to make presentations seem to be over, so the document can be the presentation medium.
* **Publication?**
Well, I'd not go that far, but the evolution to such should be easy, especially if relevant LaTex
formulae, plots with captions and relevant description have already been done.
"""
self.publishme()
def basic(self):
'''Basic framework
The simplest use case was mentioned above: Annotating plots from an analysis.
It can be implemented as this, which can be used to test the options in the next section.
#### Example
The following shows a Jupyter cell execution:
{basic}
#### Requirements
This shows the basic requirements for a function with this capability:
1. Is a member of a class inheriting from `jupydoc.Publisher`
1. Has a *docstring*, comment text which will be interpreted as Jupyter-style markdown, and which
may contain variable names in curly-brackets,
2. Has executable code, presumably creating variables, the values of which will shown in the
output.
3. Last line of the code is `self.publishme()`.
Unlike a formatted string, entries in curly brackets cannot be executed; they are names of variables accessible to the code.
#### Output
The above generates a display in the notebook. Note that the `docpath='.' specifies that output should go
into the current folder, where the notebook is. To write it to a web doc as well, add the line
```
doc.save()
```
which will result in something like
```
saved to "/home/burnett/work/notebooks/Basic"
```
The document was written into a "saved to" folder, as a file `index.html` and also folders `figures` or `images`
if needed. The name of that folder, in this case `Basic`, is by default constructed by appending the class name to the
the Python *module* name, itself related to the *file* name by
replacing dots with slashes and adding a ".py". In this case there was no module.
In summary, the structure looks like this:
```
docpath ("/home/burnett/work/notebooks")
| docname ("Basic")
| index.html
| figures
| fig01.png
| ...
| images
| ...
```
The folder pointed by `docpath` could contain other documents, a feature used in the multiple-document section of this
description.
'''
basic = self.image('images/basic_test.png')
self.publishme()
def variable_formatting(self):
r"""Variable Formatting
The list of possible variable names comes from three sources, each one updating the previous
set.
1. Built-in. A class variable `predefined`. This is set to the useful values discussed here,
but of course the user may update or replace it.
2. The local variables available to the code in the function, locally defined or defined
in the argument list, especially "self". (So predefined variables are also `self.predefined.var`)
3. Variables defined in the call to `publishme`, collected with Python's `**kwargs` mechanism.
These may override any of the previous.
This section examines formating options for such variables in curly brackets.
"""
self.publishme()
def scalars(self):
"""Scalars
A scalar variable, say from an expression in the code `q=1/3`, can be interpreted in the docstring with `"q={{q:.3f}}"`, resulting in
{indent}
q={q:.3f}.
{endp}
"""
q = 1/3;
self.publishme()
def list_and_dict(self):
"""Python lists and dicts
These basic Python data structures are represented using the "pretty printer"
[`pprint`](https://docs.python.org/3/library/pprint.html)
For example a list generate by `n = list(range(1,11))` appears thus: {n}.
And a dict generated by `d = dict((i,2**i) for i in n)` is this: {d}
"""
n = list(range(1,11))
d = dict((i,2**i) for i in n)
self.publishme()
def images(self):
"""Images
Images may be inserted into the docucument, as follows:
Using the jupydoc function image, set a variable with
a call `self.image(filename)':
```
launch_image = self.image( 'images/fermi-launch.jpg',
        caption='launch of Fermi on a Delta II on June 11, 2008", width=300)
```
referred to in this text as "{{launch_image}}", will produce this:
{launch_image}
This uses the [HTML5 `figure` tag](https://www.w3schools.com/tags/tag_figure.asp),
which manages a caption. One can also set the width or height,
see the discussion on the
[HTML `img` tag](https://www.w3schools.com/tags/tag_img.asp).
The full path for the name if not absolute, is relative to the source file.
Unless the image is already in the subfolder `images` as is the case here, it will be copied there, with an appended `fig_xx`.
An option is to specify an `image_folder` in the class constructor, for example
```
self.image_folder = '$HOME/images'
```
"""
launch_image = self.image( 'images/fermi-launch.jpg',
caption='launch of $Fermi$ (née GLAST) on a Delta II on June 11, 2008', width=300)
self.publishme()
def figures(self):
"""Figures
*This feature requires that `matplotlib` has been installed.*
Any number of Matplotlib Figure objects can be included.
An entry "{{fig1}}", along with code that defines `fig1` like this:
```
x = np.linspace(0,10)
fig1,ax=plt.subplots(num=self.newfignum(), figsize=(4,3))
ax.plot(x, x**2)
ax.set(xlabel='$x$', ylabel='$x^2$', title=f'figure {{fig1.number}}')
fig1.caption='''Caption for Fig. {{fig1.number}}, which
shows $x^2$ vs. $x$.'''
```
produces:
{fig1}
Note the convenience of defining a caption by adding the text as an attribute of
the Figure object.
The `self.newfignum()` returns a new figure number. It is necessary to for all
the figures in a section to be unique. But the actual number is set to be sequential for
the whole document.
Then number can be referred to in the text as `{{fig1.number}}`.
"""
try:
import matplotlib.pyplot as plt
except Exception as e:
fig1 = f'**{e}**'
self.publishme()
return
plt.rc('font', size=14) # worry about setting this!
xlim = (0,10,21)
x = np.linspace(*xlim)
fig1,ax=plt.subplots(num=self.newfignum(), figsize=(4,3))
ax.plot(x, x**2)
ax.set(xlabel='$x$', ylabel='$x^2$', title=f'figure {fig1.number}')
fig1.caption="""Caption for Fig. {fig1.number}, which
shows $x^2$ vs. $x$.
"""
self.publishme()
def dataframes(self):
"""DataFrames
*(This feature is only available if [pandas](https://pandas.pydata.org/) is installed)*
The code, from [this tutorial](https://www.geeksforgeeks.org/python-pandas-dataframe/):
```
    # intialise data of lists.
    data = {'Name':['Tom', 'nick', 'krish', 'jack'],
            'Age':[20, 21, 19, 18]}

    # Create DataFrame
    df = pd.DataFrame(data)
```
Results in "{{df}}" appearing as
{df}
"""
try:
import pandas as pd
# intialise data of lists.
data = {'Name':['Tom', 'nick', 'krish', 'jack'],
'Age':[20, 21, 19, 18]}
# Create DataFrame
df = pd.DataFrame(data)
except:
df = 'Pandas not installed'
#----------------------
self.publishme()
def latex(self):
r"""LaTex
Jupyter-style markdown can contain LaTex expressions. For the following, unlike the simple "`$E=mc^2$`"
→ $E=mc^2$ , it is necessary that the docstring be preceded by an "r". So,
```
\begin{{align*}}
\sin^2\theta + \cos^2\theta =1
\end{{align*}}
```
Results in:
\begin{align*}
\sin^2\theta + \cos^2\theta =1
\end{align*}
Evaluation of variables can occur within the expression as well.
"""
self.publishme()
def other_formatting_options(self):
r"""
Other Formatting options
Markdown text is designed to be readable and easy to compose, a huge difference from
the formal HTML, to which it is translated. One can of course insert HTML
directly into the text, of course compromising the readability, and requiring HTML knowledge.
Jupydoc processing allows inserting predefined strings when processing the docstring text,
which represents a compromise.
### Indenting
Indenting a paragraph is not directly possible with markdown. But we can easily insert the appropriate HTML
* {{indent}}: `{indent}` —the margin is predefined, easily changed by the user
* {{endp}}: `{endp}` — Since it represents the end of a paragraph.
Demonstration:
{indent}
This paragraph is indented 5%. It was preceded by {{indent}} and followed by {{endl}}.
To start a new line in this, or any other paragraph, insert "<br>".
{endp}
### Preformatted text from other sources
There are several ways to introduce text from other sources, all of which use the monospace font
#### monospace
The function `monospace(*text*)` is provided to achieve insertion of
"preformatted" text with a monospace font.
It can be invoked with a text string, or any object which returns a description of itself via its class `__str__`
function.
It has options `summary` and `open` to allow collapsible output. These use the
[HTML5 `` tag](https://www.w3schools.com/TAGS/tag_details.asp). Specifically, if `summary` is set to a string,
that will be displayed with a clickable diamond. The output will be hidden unless there is also a `open=True`.
For example
```
test_string = '\n'.join([f'This is line {i}' for i in range(10)])
mono_string = self.monospace(test_string, summary='monospace demo')
```
Produces this:
{mono_string}
The following all invoke `monospace`, allowing also `summary` and `open` args.
#### shell: capture output from a shell command
The function `shell` will execute one or more shell commands, return the preformatted text.
So, this code line,
```shell_test = self.shell('env | grep PYTHON')```
produces this:
{shell_test}
#### capture_print: capture printout
To execute code containg uses of the print function, that is, writing to sys.stdout,
the function `capture_print` is provided. As an example
```
with self.capture_print(summary='captured printout') as captured_text:
    print(test_string)
```
Then {{captured_text}} will be rendered as:
{captured_text}
"""
test_string = '\n'.join([f'This is line {i}' for i in range(10)])
mono_string = self.monospace(test_string, summary='monospace demo')
shell_test = self.shell('env | grep PYTHON')
with self.capture_print(summary='captured printout') as captured_text:
print(test_string)
self.publishme()
def making_a_document(self):
"""Making a document
This section introduces an enhancement to the basic framework to create a structured
*document*, with a title page, sections, and subsections.
To accomplish this there are two basic requirement:
1. the class needs to inherit from `DocPublisher`,
2. the layout of the document must be defined in the *class* docstring.
"""
#------------------------
r = np.random.random(1)[0] # will be available for subsection documents
self.publishme()
def class_docstring(self):
"""Class Docstring
The docstring is in [`yaml`](http://zetcode.com/python/yaml/), a human-readable data-serialization language
often used for configuration files. The following items, all optional, are used to define the document:
* **title** If more than one line, the second is a subtitle. Note that this entry may contain curly-bracket fields with class variable names. One example is "{version}".
* **author** Will be centered.
* **sections** A single string with names of functions corresponding to sections and possible subsections that will be parsed
* **abstract** Can be any length.
About the sections specification, this is the specification for the present document:
```
sections: introduction
        basic
        variable_formatting [scalars list_and_dict latex images
                            figures dataframes other_formatting_options]
        making_a_document [ class_docstring document_generation output_specification]
        multiple_documents [docman_setup  docman_usage docman_web index_document]
        workflow
```
Commas and line breaks are ignored, with subsection names enclosed in square brakets following the section name.
Any unrecognized fields are added to attributes of the class, available for
user configuration perhaps. For this, it is
`user_info`: "{self.user_info}"
"""
self.publishme()
def document_generation(self):
"""Document Generation
Creation of the document is performed by invoking the instantiated call. `DocPublisher` itself allows for a demonstration:
```
from jupydoc import DocPublisher
doc = DocPublisher()
doc
```
The last line provides a table of contents useful for selecting a section of subsection to display online. Actual production
of the document is accomplished by invoking it as a function, e.g.,
```
doc('all')
```
The "job" of the class is to produce the document that it is designed to do, which is performed by invoking it as a function.
The interactive display is intended to select a single section, or subsection to examine while developing the
code. If an output has been set, it will always generate the full HTML version. The argument possibilites are: 'all'
as above, the name of the function whose output to examine, or the section or subsection number. In that case, a number that
is beyond the range of sections or subsections will select the last on for display. For example, if section 4 has 5 subsections,
"4.9" will select 4.5 for display. "4.0" displays section 4 and all its subsections.
"""
self.publishme()
def output_specification(self):
"""Output Specification
The call described here runs the `save()` function described in the Basic Framework section
The HTML document is a folder, containing the the document in a file `index.html` and folders `figures` or `images`
if needed. The name of that folder, called `docname` is by default constructed by appending the class name to the
the Python *module* name, itself related to the *file* name by
replacing dots with slashes and adding a ".py". The folder that it goes into is set by "docpath".
"""
self.publishme()
def multiple_documents(self):
"""Multiple Documents
This section describes the enhancement provided by `jupydoc.DocMan` to manage multiple documents, both the source files,
or Python modules, and any generated documents.
"""
self.publishme()
def docman_setup(self):
"""Setup
Here is a Jupyter notebook cell:
```
from jupydoc import DocMan
dm = DocMan('jupydoc')
dm
```
The first line imports the Jupydoc document manager DocMan. The second
instantiates it with the name of the package, or folder containing source documents.
It must be in the Python path, or have been already loaded.
The final line generates a summary of the file structure
and available document classes:
```
    Modules                   Classes
    jupydoc.
        documents               ['Manual', 'Technicals']


    docspath: /home/burnett/work/tburnett.github.io
```
The first column, under "Modules", shows the file structure. Names ending with a period are packages, that is,
folders containing an `__init__.py` file, otherwise python files, or modules. The second column has the document
classes declared in the module.
In this case the package is `jupydoc` itself. Only one of its modules, the present one, the file, `documents.py` declared document classes.
Each source file defining a module needs to declare class(es) that it contains. This one has
the lines:
```
from jupydoc import DocPublisher
__docs__ = ['Manual', 'Technicals']
```
`DocMan` does a recursive search for all modules contained within the parent package.
Note that instead of "dm" on the last line, that "dm?" produces that, but also the signature
had help for the function.
#### docspath
The parameter `docspath` is indentical to the `docpath` discussed above . The "s" is to
convey the multiple document orientation. It can be defined in the by a `docspath=` in the top-level package's `__init__.py`, which would
be overridden with an argument to the `DocMan` instantiation.
If the declaration is relative, it will be with respect to the top-level package.
"""
self.publishme()
def docman_usage(self):
"""Usage
With the DocMan instance generated in the setup phase, the following instantiates
a document instance "JupyDoc", as described in the
"Making a Document" section.
```
doc = dm('Manual')
```
One useful feature of instantiating the document via `DocMan` is that the module
containing the class is reloaded first, relieving the need to separately manage that
in the notebook. So changes to source are immediately made, and compilation errors
reported.
"""
#--------------------------------------------------------------------
self.publishme()
def docman_web(self):
"""Web site
After `DocMan` instantiates a document class, before returning it to the user,
it adds an *indexer* attribute, a `DocIndex` instance. Then, before the document
saves itself, it invokes the indexer.
The indexer manages the folder `docspath`, containg the document as website.
This involves two files:
* `index.html`, which defines content for the website, specifically a table
of the documents that it contains
* `index.yaml` An editable index with information for each document, at least
the date and title.
When the indexer is invoked, it updates both files.
Here is what the index looks like:
{index_image}
It is described in the next subsection.
#### Linked documents—client-mode
One can insert links to other documents saved by `DocMan`. This is especially useful in an
analysis mode where the linked document was generated in conjunction with a previous
analysis stage, perhaps preparing a dataset, available as attributes of the object.
To implement this, `DocMan` adds a callback to itself, 'docman`, to the object before calling it. Then the document can invoke the other document like this:
```
otherdoc, link = self.docman.client('Technicals')
```
and then use the link: {{link}}, which evaluates to `{link}`, can be used like this:
```
some technical details
```
generates a link to some technical details, as well as
the other document object itself.
The other document can detect that it was invoked in this way with an attribute
`client_mode`, and not regenerate the document if it exists.
"""
#--------------------------------------------------------------------
index_image = self.image("images/jupydoc-index.png", caption='Appearence of index.html in a browser')
otherdoc, link = self.docman.client('Technicals')
self.publishme()
def workflow(self):
"""Workflow
This started as a little project to allow me to better organize my research,
incorporating generating research notebook (not JupyterLab) entries and facilitating
generation of presentations. Some of the motivations were hinted at in the
introduction.
It soon became apparent that this could be similarly useful to others, which
generated a substantial effort to turn it into a clean package that would be iniviting
not only to use, but to make improvements to.
It represents for me, a dramatic workflow paradigm change, implying revisions to
present code, with a different file structure.
I have yet to spend much time on that, and plan to record conclusions here as I update
this file.
### Log of updates, observations
#### 06/18/2020
Release "beta" version
#### 06/22/2020
* Add `self.shell`.
* Adjust generation loop to avoid output to the document if any section fails, and
optionally terminate.
This is part of a realization that my early focus on this as a document-creation
project needs to account for the more research-oriented *analysis*, where sections
represent stages—so a failure of any stage should interrupt the process.
#### 06/24/2020
Start on the idea of making a doc class a client: quietly perform some task with link to
as associated document.
Also allow a _version_ of a document, with a compound name, classname.version
#### 07/04/2020
Implement `' for `monospace` output, including the functions `shell` and `capture_print`.
#### 07/15/2020
Realize that I want it to be easy for a document to be a simple note, appropriate for a sidebar.
To do this, I define a "title_page" function, with no sections. Maybe a separate class Memo?
#### 11/17/2020
Implement the "Index" capability using a document called `Index`.
"""
#----------------------------------
self.publishme()
def index_document(self):
"""Index Document
The folder containing the documents is indexed by a file index.html containing a table of links to the documents.
It is actually a document itself, created by a class called "Index". There are two ways for the user to adjust its
appearance:
1. The presence of an "Index" declaration in the `__init__.py` file. It should be a yaml text string which declares
"title" and "abastract", and optionally "author".
```
Index=\\
'''
title: A collection of documents
abstract: |
These are the documents relevant to an important study.
'''
```
2. The presence of an "Index" document class.
It one of the documents is named "Index", and "Index" is not an attribute of `__init__.py`, then that document will be used to
create the `index.html` file.
"""
self.publishme()